How to Install Windows 10 without USB or DVD

How to Install Windows 10 without USB or DVD
Are you facing trouble with your Windows 10? Want to install renew your Windows 10 but didn't have a USB or CD  or DVD? Don't worry you can install your Windows 10, without having a Windows 10 image CD / DVD or USB. You have to follow few simple steps and you did it.
Also read: How to make your USB Bootable

How to install Windows 10 without CD or USB

Step: 1
Click START and click Settings.
Click START and click Settings

Step: 2
Now click Update & security
Also read: How to Register Windows for FREE 10/8/8.1/7
Step: 3
Click Recovery
Click Recovery
Step: 4
Click Get Started
Click Get Started

Step: 5
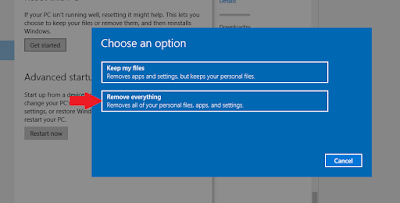
A popup Window will appear select Remove Everything. (I recommend to select Remove Everything)
A popup Window will appear select Remove Everything
Step: 6
Everything is perfect, you may need to wait for some time. Removing everything will take time a little bit longer, but trust me that is the best option, If your PC hit by some viruses like trojan, rat, horse or some malware, It will completely clean your PC from that. 
Once this is done, you will get to the Windows 10 installation setup after Restart, I hope you will pass the other simple steps of the Windows installation.
And that's all you will get to the Windows Installation. I don't have the other screenshots because of the PC restart after the step-6 and then enter to the boot Windows installation.

Video Tutorial

Updating...

Download WinRAR 5.71 Full Version for FREE

Download WinRAR 5.71 Full Version for FREE

About WinRAR 5.71

WinRAR is a file archiver that compresses and decompresses files RAR, ZIP, CAB, ARJ, LZH, TAR, GZip, UUE, ISO, BZIP2, Z, and 7-Zip. It encrypts the package and creates the backup. It is supported by all version of Windows.
I'm using this software for compressing our software, games, and other files. You must need this to extract our software, files or games.

Why need WinRAR full version?

Because when you are trying to open WinRAR some popups appear which will make irritate sometimes. For this purpose, you may need to have a full version.

Screenshots

Irritative Popups Appear

How to register WinRAR

Step: 1
Download WinRAR 64 bit
or
Download WinRAR 32 bit

Step: 2
Download a Registration File
Password: focdownloads.blogspot.com (One Click Copy Password)
For extracting you may need WinRAR.

Step: 3
Copy the rarreg.key file that you download and paste it into the directory folder where WinRAR installed and that's all you have done it.
The directory must be
C:\Program Files\WinRAR

Video Tutorial

Comment below if you have any question or facing any problem

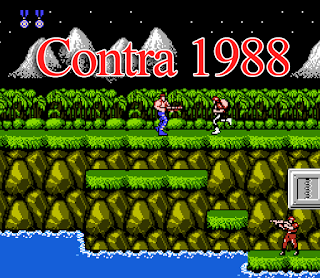
Download Contra 1987 - 1988 Game For PC

Download Contra 1988 Game For PC

About Contra 1987 or Contra 1988

An action game was developed and published by Konami in 1987, Contra is an arcade game which allows the user to run and shoot the enemies, tanks, and a lot of robots. Later on, Nintendo Entertainment System releases its home version for PC. It is a great game for 90's kid, and I hope you will like it as well if you do not belong to '90s. It will bring your childhood back.
Contra isn't available for modern Operating System, to run it on the modern OS we have added Nester Rom Game Pack and its emulator. Nester Emulator is very good to run all the Nester games such as Super Mario, Hercules and much more.

Screenshots

Download Contra 1988 Game For PC

Download Contra 1988 Game For PC

Download Contra 1988 Game For PC

Requirements

  • OS: Windows 10/8.1/8/7/95/98/ME/2000/XP
  • CPU: Pentium @ 90 MHz Processor
  • Video Memory: 4 MB
  • RAM: 16 MB
  • Hard Drive: 10 MB Free
  • Sound Card: DirectX Compatible
  • DirectX: 7.0
  • Game size: 2.58 MB

Download

Download Mirror 1 (G drive): Contra 1988 For PC
Download Mirror 2 (MegaNZ): Contra 1988 For PC

Password: focdownloads.blogspot.com (One Click Copy Password)
For extracting you may need WinRAR. Download WinRAR Latest Version

Controllers

Moments: UP + DOWN + LEFT + RIGHT (Arrow Keys)
Jump: Z and X
Fire: Space and A
Start Game: Enter

Video Tutorial

If you have any question you can comment below.

How to make USB bootable for Windows / Linux

How to make USB bootable for Windows / Linux

Making your USB bootable is very easy than you think. You can make your USB bootable for Linux, Windows, etc. You have to use a software name, Rufus, it is an automatic software to make your USB bootable within few minutes.

"Rufus is a utility software that will allow you to format and creates your USB flash drives bootable."

Rufus 2 is faster than all other software, It is faster than making USB bootable manually. For making bootable usb for Linux you must have the Linux ISO file. To make usb bootable for linux or to make usb bootable for windows the ISO image available for download, you can download it.

Download

Download Link 1 Rufus 3.5
Download Link 2 Rufus 3.5
Password: focdownloads.blogspot.com (One Click Copy Password)
For extracting you may need WinRAR. Download WinRAR Latest Version

How to make my USB bootable

Step 1:
 Download Rufus, And install Rufus, It is faster and having size up to 1MB.
 Download Image files of your OS, Click below buttons whatever version you want to download.
Download Windows 10 Images

Download Windows 8.1 Images

Download Windows 7 Images

Download Ubuntu 18.04.2 (Linux) Images

Step 2: 
 Plug-in the USB and open Rufus, Choose a device, check Quick Format, then click on the CD to choose ISO.
Open Rufus, then click on the CD to choose ISO
Step 3:
 After selecting your ISO file you will need to choose Standard Windows Installation and then click Start. The format will be required click OK.
Choose Standard Windows Installation and then click Start

The format will be required click OK

You will need to wait for some time, It took 18minutes and 30seconds for me.
USB became bootable

Video Tutorial

Comment below if you have any question or found broken link.

How to Extend Adobe Trial Period of Any Adobe Product

How to Extend Adobe Trial Period

Explanation

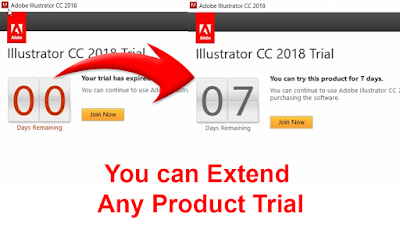
 Adobe is has a lot of products but many of them are paid, but you can use them free for some time. Once the trial expired, you will need to pay for the product and then you can use that product, otherwise, you will get the error 00 Days Remaining.
 Adobe Illustrator has 7 days trial period, Adobe Photoshop has 30 days trial period, Adobe After Effects has a 7days trial period, Adobe Premiere Pro has a 7days trial period, etc. Once it is expired you can use the software again.
 So, I will show you how to get rid of it, you can extend it for free. Please keep in mind this is not a crack or something. It is just a trick with which you can extend the Trial Period of the products.

How to Restart the Trial Period of Adobe

Step 1:
You have to find the AMT folder in the folder of your Adobe Product. To make it concise I will use Adobe Illustrator CC 2018 in my example.

Goto Program Files > AdobeAdobe Illustrator CC 2018 > Support Files > Contents > Windows > AMT
Path :
C:\Program Files\Adobe\Adobe Illustrator CC 2018\Support Files\Contents\Windows\AMT

Here you will find a file name application.xml, Right click on it Cut and Paste it in any other drive.

application.xml, Right click on it Cut

application.xml, Paste it in any other drive
Step 2:
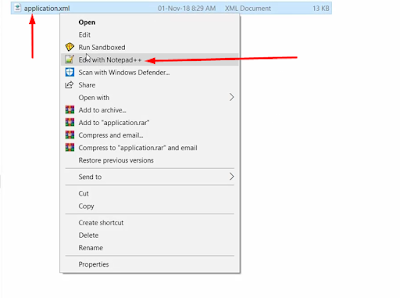
 Right-click on application.xml and open it with Notepad
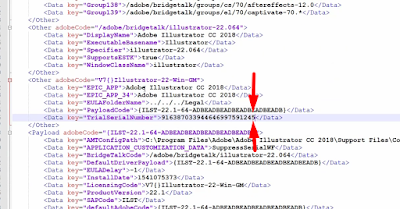
Now find <Data key="TrialSerialNumber">
You will see a number there for example:
<Data key="TrialSerialNumber">926287011921234454671866</Data>
Change it to
<Data key="TrialSerialNumber">926287011921234454671867</Data>
I mean just +1 to the last number, and save the notepad.

application.xml and open it with Notepad

Now find <Data key="TrialSerialNumber">

Just +1 to last number

Step 3:
 Now Cut the application.xml and Paste it back into the AMT folder.
Now Cut application.xml

Paste application.xml in the AMT folder
Step 4:
(If you're logged in, then no need of this step)
Disconnect the internet to bypass the login.
Disconnect the internet to bypass the login
Step 5:
Sign In Later

Sign In Later

 Start Trial :) I mean again ;)

Start Trial - again

Running Illustrator with Start Trial Again

Video Tutorial

If you have any question or facing problem or have some suggestion comment below.

Adobe After Effects Startup Error 23::46 - [SOLVED]

After Effects Startup Error 23::46 - [SOLVED]

Error "Could not convert Unicode characters"

 While starting Adobe After Effects CC 2019, I was facing the error "could not convert Unicode characters ( 23::46 )". This is error was encountered because of the System Locale which is set to Unicode language. So I fixed it and now letting you how to fix it.

How to fix error 23::46

Step 1:
   Open Control Panel > Clock, Language, and Region > Open Region
Location path: Control Panel\Clock, Language, and Region
Control Panel > Clock, Language, and Region

Control Panel > Clock, Language, and Region > Open Region
 Step 2:
   Click AdministrativeChange System Locale
Administrative >  Change System Locale

Step 3:
  Uncheck the Beta: Use Unicode UTF-8 for worldwide language support, and hit OK
Uncheck the Beta: Use Unicode UTF-8 for worldwide language support, and hit OK

  And press Restart Now.
After the restart, the error will vanish and you will enjoy the tool.

Video Tutorial

If you have any question or suggestion comment below.

Taskbar Is Visible When Fullscreen - [SOLVED]

Taskbar is visible when fullscreen - [SOLVED]

Taskbar Issue Fix - Describing Issue

Recently, my windows were encountered with an error.  I found the fix for that and want to share it with you guys. It's simple, easy and quick FIX.
When you have to full screen any video player or game the taskbar won't hide automatically. I was facing this issue when I open youtube video in fullscreen mode or open any video in VLC the taskbar won't hide.

Screenshots

Taskbar is visible when fullscreen

Taskbar is visible when fullscreen
See taskbar is visible during fullscreen
Taskbar is visible when fullscreen - FIXED
When it is fixed

How To Fix It

Step 1: 
Right-click on the Taskbar and click Task Manager.

Right click on the taskbar and click Task Manager

Step 2:  
Now click Windows Explorer and then click the Restart button which in the bottom of the Task Manager.
Click Windows Explorer and then click Restart
And wait for a few seconds, I mean about 20seconds and there you go, everything is ok.

Video Tutorial


Comment below if you have any question regarding this post, or you can appreciate me as well. Thanks

Download Disney's Aladdin 1993 For Windows 10, 8, 7

Download Disney's Aladdin 1993 For Windows 10, 8, 7
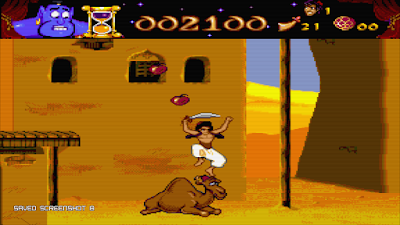
Aladdin is one of the game belongs to '90s memories. It is developed after when the Aladin movie was released in 1992. This game was developed with the same name as the movie by the Disney Software and Virgin Games.
I found this game useful to share with you guys, download it and enjoy this joyful game.

Screenshots

Download Disney's Aladdin 1993 For Windows 10, 8, 7

Download Disney's Aladdin 1993 For Windows 10, 8, 7

Download Disney's Aladdin 1993 For Windows 10, 8, 7

System Requirements

Release date: 1993
CPU: 166MHz
OS: Windows XP/Vista/7/8/8.1/10
RAM: 128MB
VGA Card: 32MB
DirectX 6.0 compatible graphics card
Hard Free Space: 35MB
Game Size: 9.30MB (compressed in RAR)

Download

Download Mirror 1: Disney's Aladdin 1993
Download Mirror 2: Disney's Aladdin 1993
Download Mirror 3: Disney's Aladdin 1993
Password: focdownloads.blogspot.com (One-Click Copy Password)
For extracting you may need WinRAR. Download WinRAR Latest Version

Video Tutorial

How to Remove Watermark and SmartScreen Windows 10 and 8

Remove Watermark and SmartScreen Windows 10
Watermark in windows 10 and windows 8 is somehow irritative. If you don't want to buy just want to remove the mark, then let me show you how to remove Watermark and SmartScreen with one click. So just follow these steps you have did it.

Download

Download CMD Files
Password: focdownloads.blogspot.com (One Click Copy Password)
For extracting you may need WinRAR. Download WinRAR Latest Version

  1. After download and extract, you will find Remove and Restore folder. 
  2. You have to open the Remove folder. 
  3. There you will find files, Auto (Run as Admin).cmd and RemoveWaterMark.cmd
  4. Run these 2 files as administrator and restart your PC.
And enjoy Watermark and SmartScreen Free Windows.

Video Tutorial

How to Register Windows

How to Register Windows For Free
Today I'm sharing you a method that will help you to register Windows for FREE. It will work for all version of windows. Your windows will be registered with the Microsoft officially released Product Key. These are the legit keys. Reference
So I don't think so it will cause an issue, I'm sharing you my method.

Product Keys

Home: TX9XD-98N7V-6WMQ6-BX7FG-H8Q99
Home N: 3KHY7-WNT83-DGQKR-F7HPR-844BM
Home Single Language: 7HNRX-D7KGG-3K4RQ-4WPJ4-YTDFH
Home Country Specific: PVMJN-6DFY6-9CCP6-7BKTT-D3WVR
Professional: W269N-WFGWX-YVC9B-4J6C9-T83GX
Professional N: MH37W-N47XK-V7XM9-C7227-GCQG9
Education: NW6C2-QMPVW-D7KKK-3GKT6-VCFB2
Education N: 2WH4N-8QGBV-H22JP-CT43Q-MDWWJ
Enterprise: NPPR9-FWDCX-D2C8J-H872K-2YT43
Enterprise N: DPH2V-TTNVB-4X9Q3-TJR4H-KHJW4
These are the keys, you can copy the key according to your windows edition. At my case, I was using windows 10 Education.
So I use NW6C2-QMPVW-D7KKK-3GKT6-VCFB2
But you just need to choose the key which matches your windows edition.

Method

Open CMD as Administrator
Run CMD As Administrator

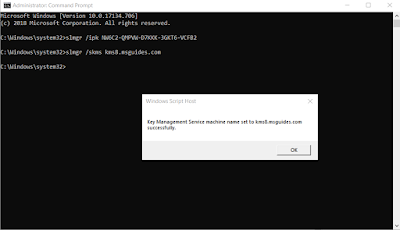
Now Type these commands
slmgr /ipk Your_KEY
Replace YOUR_KEY with any of the above keys and Press ENTER.
slmgr /ipk NW6C2-QMPVW-D7KKK-3GKT6-VCFB2

How to Register Windows

How to Register Windows

Now enter
slmgr /skms kms8.msguides.com
and press ENTER
How to Register Windows

 Now enter
slmgr /ato
Press ENTER and wait for the response.

How to Register Windows
Hurrah you did it, you got the registered version you can verify it and enjoy.

Video Tutorial

If you have any question comment below.