Showing posts with label Tutorials. Show all posts

[Solved] How to Fix 'The request is blocked' Error on LinkedIn or Microsoft

LinkedIn 'The request is blocked'
Are you seeing error messages like "The request is blocked," "Service unavailable," "Request denied" or "Account network blocked" when you try to visit LinkedIn? It can be really frustrating, especially if you rely on LinkedIn for networking, job hunting, or business opportunities. This usually happens because security software like Avast Antivirus unintentionally blocks the sites. In this post, I'll explain why this happens and offer a simple solution to get back on LinkedIn without compromising your online security.

Why Does This Happen?

You know, antivirus programs like Avast are meant to protect your computer from online threats by checking websites and stopping potentially harmful ones. But sometimes, this protection can be a bit too cautious, and it ends up mistakenly flagging safe websites like LinkedIn. The Web Shield component of Avast, in particular, can cause these errors, leading to all sorts of access problems on legitimate websites. A lot of folks have said they get error messages like "The request is blocked" when they try to get on LinkedIn.

Step-by-Step Solution

To resolve this issue without turning off your antivirus protection, you can simply add LinkedIn to Avast's Web Shield exceptions. This will allow LinkedIn to get through the Web Shield without affecting security checks for other sites.

Here’s how you can do it:
1. Open Avast Antivirus: Start by opening your Avast application. You can do this from your desktop, start menu, or system tray.
2. Navigate to Web Shield: Go to 'Explorer', select 'Web Shield', and click on 'Open Web Shield'.
Open Web Shield

3. Access Exceptions Settings: Within the Web Shield interface, locate and select 'Exceptions' and click on 'Add Exception'.
Click on 'Add Exception'

4. Add LinkedIn as an Exception: Now enter *.linkedin.com in the field provided to ensure all LinkedIn subdomains are included. This wildcard ensures the exception applies to both HTTP and HTTPS protocols of LinkedIn.
Add *.linkedin.com to website url
Verify that linkedin is added


5. Save and Exit: After adding the URL, save your changes and exit the settings menu.
6. Test LinkedIn Access: Try accessing LinkedIn again. It should now load without triggering the previously encountered error messages like "The request is blocked," "Service unavailable," "Request denied," or "Account network blocked".


By setting an exception for LinkedIn in Avast's Web Shield, you're basically making sure that the site won't get blocked incorrectly, which is important for your professional work. It’s important to only make exceptions for websites you trust to keep your online activities secure.

Conclusion

With these steps, you can quickly restore access to LinkedIn and avoid common errors like "Account network blocked" and "Request denied." This post not only helps you tackle these specific issues but also enhances your understanding of how to manage your antivirus software to support rather than hinder your internet usage. Remember, it's crucial to keep your security settings updated and fine-tuned to balance safety with accessibility. 
Rest assured, you're not alone in this, and I'm here to help you comment below.

How to fix Google AdSense error "We apologize for the inconvenience..."

How to fix Google AdSense error "We apologize for the inconvenience..."

Google Adsense Publisher

Google AdSense is an excellent way for bloggers to make money from their blogs. You can sign up as an advertiser and place ads on your site that will generate revenue based on impressions, clicks, or conversions.

While using Google AdSense, you may face a lot of issues and errors. From the beginning to start with a new AdSense account until you get your first payment. Anyway, I will let you know about other issues some other time. Right now, I'm letting you know about the basic problem many AdSense publishers face while using the AdSense dashboard.

When you click on the Policy Center or Payment settings, the below error will propagate. 
We apologize for the inconvenience, but we are unable to process your request at this time. Our engineers have been notified of this problem and will work to resolve it.

It's very frustrating because many others will say to fix the Google AdSense issue, "We apologize for the inconvenience..." then clear cookies, cache even some will say log out and then log in after some days bla bla bla. I will tell you don't listen to them. :P

We apologize for the inconvenience, but we are unable to process your request at this time. Our engineers have been notified of this problem and will work to resolve it.

The only reason for this error is that you are using Ads Blocker, no matter which ads blocker you are using, but the ads blocker is the only reason for this issue.

How to fix Google AdSense error "We apologize for the inconvenience..."

  1. Disable Ads Blocker.
  2. Hit Refresh or F-5.
Disable ad blocker for Google AdSense
Disable Ad Blocker for Google AdSense

After disabling Ad Blocker hit Refresh

I'm sorry for making this tutorial a little bit longer. That's what the Google Search Engine algorithm wants me to do; otherwise, you won't find my tutorial on top of other pages.  

Video Tutorial


How To Enable HTTPS/SSL Certificate for Custom Domain in Blogger

How To Enable HTTPS/SSL Certificate for Custom Domain in Blogger

HTTPS For Blogger

Blogger with a custom domain and without SSL is nothing. You will lose your visitors as a search engine like Google will send your website back because HTTPS is essential, as search engines now need trust before sending a visitor to any link. If a site does not have HTTPS or SSL, a search engine like google or any other will try to send your website to the bottom or even off to any other pages, with this way, you will lose organic traffic. No matter how strong your content is, a search engine will not bring your site up if you don't have an SSL Certificate installed.

What is an SSL Certificate?

SSL Certificate installation is the process of installing a digital certificate onto your website or blog. SSL will ensure that all data transferred between you and your visitors are encrypted, making it difficult for hackers to steal sensitive information like credit card numbers.

Why is SSL Important?

SSL plays an essential role in SEO, and it's mandatory to have an HTTPS if you want to rank your website with various search engines like Google, Bing, Yandex, etc. Even almost all browsers are now issuing a warning message of "not secure" if your website doesn't have a valid SSL Certificate Installed.

According to SemRush

As of 2021, more than 500 million blogs exist out there, with more than 409 million visitors each month.  Users produce around 70 million new posts and 77 million new comments each month. Content marketing predicts to be an industry worth $412.88 billion.

Now, let's make it short you came here to know how to install an SSL certificate on your blogger blog or enable HTTPS on your blogger blog. Before moving on further, make sure in blogger in Settings find Publishing and confirm that Custom domain installed, and Redirect domain is active.

No please follow the below steps to install a free SSL certificate for the blogger blog.

Steps:

  • Go to Settings
  • Go down to HTTPS

You will see below HTTPS availability Status: No.

HTTPS availability Status: No

  • Just turn on HTTPS availability, and you will see the Status Unknown.
Turn on HTTPS availability
  • After this, refresh the page, and now you will see Status: Pending - HTTPS Availability is being processed. Try again later.

Status: Pending - HTTPS Availability is being processed. Try again later


Now you have to wait for 5-10 minutes, and Google Trust Services LLC will issue you an SSL Certificate for Free Forever.

  • Now refresh the page, and you will see Status is available.
HTTPS Availability - Status is available

  • Now turn on the HTTPS redirects
Turn on the HTTPS redirects

And that's all. 

I know you must have some queries, but before you ask me a question, I'm trying to cover almost all of your questions here below. If you still have any questions, you can ask me in the comment section below.


Why is my blogger site not secure?

Because you did not enable HTTPS for your blogger, go to Settings, scroll down to HTTPS and turn HTTPS redirects.


Blogger HTTPS availability is Status unknown?

When you turn on HTTPS availability, the Status will become unknown, refresh the page, and you will see the result.


Blogger HTTPS not working?

Sometimes it happens when you google issue an SSL certificate, but you still see the HTTPS is not working, don't be panic. It will take some time, it can be up to 30minutes, and your certificate will become available globally. 


What to do when blogger SSL Error "Status: Pending - HTTPS Availability is being processed. Try again later?".

Don't be panic. Google is issuing an SSL certificate, and it may take a while.


How much time does blogger take to issue an SSL?

It will take 5-10minutes, but it can take up to 30minutes in rare cases.


It took more than 30 minutes. HTTPS availability status is still pending. What to do?

May any conflict happens, in this case, you have to verify certain things; first, check your custom domain is setup correctly and working, and make sure your custom domain is not expired. Then you have to turn off HTTPS availability and turned it on again after a minute. And then, wait for 5-10 minutes, and you will get your FREE SSL certificate for your custom domain in blogger.


HTTPS availability Status: Failed - HTTPS SSL Certificate failed to be processed?

This is the error when your domain is not properly working or DNS is removed, or not accessible or maybe you just recently change it to blogger, please give it some time, DNS normally takes 12hrs-72hrs to propagate properly. Once your domain working properly then you can simply Install HTTPS for your blogger.

Video Tutorial

How To Unblock Your URL On Facebook - Unblock My URL Within Tutorial Live

How To Unblock Your URL On Facebook

Unblock URL From Facebook

    People faced a huge amount of blocking websites from Facebook when Facebook released its webmaster tool. Actually, the Facebook webmaster tool blacklist many of the websites, as the website grows quickly. I noticed this issue when my brand new web, got blocked by Facebook for no reason, actually, I know how to bring a website on the first page of Google, also I know how to make your website popular on social media, I will write a post on it if I got some spare time.

    I searched this issue for several days, I find nothing on the internet, even Facebook Community Help haven't any solution. All of them said, click on "Let us Know" and submit a form, and your website will be unblocked, within a few days. I tried that, as Facebook suggests that as well.
Facebook URL Blocked Community Standards

Facebook Blocks Let Us Know


    But this did not help me because Facebook clearly wrote:
To help keep Facebook safe, we sometimes block certain content and actions. If you think we’ve made a mistake, please let us know. While we aren’t able to review individual reports, the feedback you provide will help us improve the ways we keep Facebook safe
    So, I notice something suspicious here, "While we aren’t able to review individual reports", and this forced me to research more, so I tried, tried, and tried...

    But, one day I got lucky, I came to know that there is a way to contact Facebook Support directly, and they will help you only if the issue is related to any business. And let me tell you that the issue of unblocking websites on Facebook is related to business. So, Facebook will definitely help you with this.

So here is the start of "how to unblock my website URL on Facebook".

Step 1: Visit Facebook business help: https://web.facebook.com/business/help

Step 2: Scroll down and at the bottom click "Get Started".

Facebook Business Help Get Started
Click on Get Started

Step 3: Then below Are you an Advertiser? Click on "Get Support".

Facebook Business Help Get Support
Click on Get Support

    Now you have to choose the way to contact Facebook Support, there are two ways to contact them, don't worry they will reply on both if you want to get quicker help, then you have to choose the chat but most of the time team on the chat support are so much busy, if you choose Email then you have to write the complete details you can see email template.
Hi Facebook,
    My website is blocked by Facebook, I think its a mistake, I submit the form given by "Let us Know" several times, but I didn't receive any reply from Facebook. I have read "Facebook Community Standards" and the website is normal and safe for user and do not have any harmful thing to be blocked.
    So, I want to submit an appeal, please consider my appeal and check my website and unblock my website, ASAP.
    My audience are worried about it please help me. Here is my website URL.
    1. Page ID : {PAGE_ID_YOU_GET_IT_IN_ABOUT_SECTION}
    2. Blocked website URL: {URL_OF_BLOCKED_WEBSITE}
Thank you
Regards,
{YOUR_NAME}

Support Chat

    To Chat there are not two ways of contacting via chat, as of today 2021, I can see two options to start a chat. 

1st Method: Below "Are you an Advertiser?" Click on "Get Support". Then click on "Chat" and submit the form given to you by Facebook and "Start Chat", but most of the time this option is not available because Facebook advertiser supports busy a lot, so you can go for 2nd method.

Start Chat with facebook support

2nd Method: Below "Do you use Audience Network?" Click on "Get Support". Then click on "Chat".

Support Chat Network

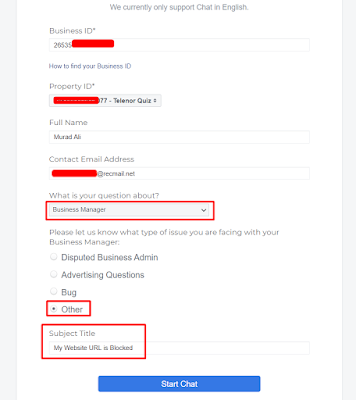
Support chat form to start a chat.


    Submit the form to contact via chat, business ID will be required. Property ID, you can select it from the dropdown, then choose the question type "Business Manager", then select Other and write your Subject Title.
    Now Start Chat.

    Facebook Support will reply back, tell them to Unblock your URL. Here is the template you can copy and paste to them.
My website is blocked by Facebook, I think its a mistake, I submit the form given by "Let us Know" several times, but I didn't receive any reply from Facebook. I have read "Facebook Community Standards" and the website is normal and safe for user and do not have any harmful thing to be blocked.

So, I want to submit an appeal, please consider my appeal and check my website and unblock my website, ASAP.

And wait for their reply and then chat according to their reply, they will ask you about the

    1. Page ID : 
    2. Blocked website URL: 

If your website has a page you can simply give them your Page ID, and your website URL. They will submit your appeal.

Here is my chat with Facebook.
 
My With Facebook Chat

Now wait for 2-7 days and your website will be unblocked. My website was unblocked in 2 days.
Email proof of unblock
Email proof of unblocking

Video Tutorial

How To Host Your CSS/JS On Google Drive For Your Website or Blogger

How to Host your CSS/JS on Google Drive for your website
Do you want to save bandwidth? or want to save stylesheets or javascript files for your blogger? For blogger you must need to have a files hoster or CDN, I will recommend you google drive, to host your file. It is FREE, and working as CDN too. So don't worry about this problem, I have the solution here for you. All you need to have a Gmail account. And then upload your files to google drive and make it accessible for anyone, and just place its URL inside your website HTML file.

How to Host Stylesheet and Javascript files on Google Drive

Before the Bootstrap CSS
How To Host Your CSS/JS On Google Drive For Your website
HTML Code without Bootstrap

How To Host Your CSS/JS On Google Drive For Your website
Output
Step 1:
Login to your google drive, and upload your CSS and JS files.
Step 2:
Once your files uploaded, you have to share it with anyone, change its sharing property.
How To Host Your CSS/JS On Google Drive For Your website
Right click on the file you uploaded, then click Share.

How To Host Your CSS/JS On Google Drive For Your website
Now choose advanced.

How To Host Your CSS/JS On Google Drive For Your website
Now change "Who has access" from private to public

How To Host Your CSS/JS On Google Drive For Your website
First, choose Public on the web, and choose anyone Can View.

How To Host Your CSS/JS On Google Drive For Your website
Now Copy the Link and click Done
Step 3:
Now its time to make direct download link for your google drive file.
How to generate Google Drive Direct link
Just visit https://drive.recmail.net/ and generate direct link by pasting the copied link and once the link generated to copy the output direct link.

How To Host Your CSS/JS On Google Drive For Your website

How To Host Your CSS/JS On Google Drive For Your website
Step 4:
Now add the copied URL to your HTML file and check its output. You will find that bootstrap stylesheets start working.
<link rel="stylesheet" href="Google-Drive-Direct-Link">
How To Host Your CSS/JS On Google Drive For Your website

How To Host Your CSS/JS On Google Drive For Your website

Video Tutorial

Please Insert the CD-ROM [SOLVED]

Are you getting the error "Please insert the CD-ROM"? It's OK you can fix it, some people will share cracks and a lot of stuff to bypass this error, I will never recommend using EXE crack, such files have a virus, malware, rats and more harmful stuff.
So, what is the legit way to fix this issue? First please don't relate it to The House Of The Dead only,  It can occur on many other games as well such as Need For Speed II, Contra 1987, Aladdin 1993, Hercules 1997, Zuma Deluxe. I'm just using the THOTD game as an example.

How to fix "Please insert the CD-ROM"

This is very simple, all games that are developed in the 90's era or must require Direct X. In this modern era still, some games are using the old version of Direct X.
Download DirectX R and install DirectX (R) Once you did you will no longer receive this error.

Video Tutorial


How You Can Open Port / Forward Port On Any Modem - PTCL

How You Can Open Port / Forward Port On Any Modem - PTCL

An opening port is quite easy if you did everything perfectly. When I was trying to open port or forwarding a port I faced a lot of issues, First finding a good and accurate method on the internet in some cases is not easy, I tried on USB Dongle, I tried on DSL but unfortunately no success.
Sometimes windows firewall don't allow to Open a port, anyway, we will bypass that in this tutorial you have to follow me step by step to get rid of everything and open your port and enjoy.
How You Can Open Port / Forward Port On Any Modem - PTCL
Image source: openport.io

How to Forward/Open a Port

Step: 1
You need to have a software called Port Forward, click here to download it. Port Forward is trial software which will help us to bypass Windows firewall.
Step: 2
Login to your modem setting area, or modem panel. At my case my modem is PTCL, and panel URI is 192.168.10.1
After login, check your WAN Info and confirm it, which WAN Interface is connected, that assigned an IP to your computer.
In Device Info Click on WAN

WAN Info will show you which interface is connected

Step: 3
Now go to Advanced Setup > NAT > Virtual Servers. Now you have to ADD a Virtual Server, Click on ADD
How You Can Open Port / Forward Port On Any Modem
Step: 4
Now choose the WAN Use Interface which was connected in Step 2. 

How You Can Open Port / Forward Port On Any Modem
You can Select a Service or you can put a Custom Service name. Keep the following setting.
  • Custom Service = TestingPort
  • Status = Enable
  • External Port Start = 27051
  • External Port End = 27051
  • Protocol = TCP/UDP
  • Internal Port Start = 27051
  • Internal Port End = 27051
How You Can Open Port / Forward Port On Any Modem
But, wait what about the Server IP Address: ?, We have to find it manually there are 2 ways to find it.
First: Open CMD and type ipconfig and hit ENTER
Under your network connection, IPV4 is your local machine IP address.
ipconfig, Finding IPV4 address
Second: Open your Network Properties. And you will find your IPV4 address there as well. I think the second one is more easy and accurate.
How You Can Open Port / Forward Port On Any Modem

How You Can Open Port / Forward Port On Any Modem
Now enter this IP Address into the Server IP Address, and click Apply/Save.
How You Can Open Port / Forward Port On Any Modem
And that's all you did it.
Step: 5
Let's go and verify it. First, you have to verify it using PortForward Software that you download in Step 1.

How You Can Open Port / Forward Port On Any Modem

How You Can Open Port / Forward Port On Any Modem

How You Can Open Port / Forward Port On Any Modem

Once you have checked your port using PortForward and you got the result OPEN, its mean your Port is available to the public on the internet, so they can access your port using the public IP address and Port. You can check your port on various sites here I'm checking it with https://portchecker.co
PortChecker.co - How You Can Open Port / Forward Port On Any Modem

Video Tutorial

If you have any question or facing problem you can simply comment below I try my best to help you out and fix the issue you are facing.