Showing posts with label Tutorials. Show all posts

How to create PayPal account in Pakistan - Unsupported Countries

PayPal account in Pakistan

About PayPal

PayPal is one of the biggest company which is supported by almost every shop, stores, etc. Such as you can buy items from eBay ( Partner Organization ), You can make purchases in iTunes, Google Play, etc. You can receive and send money worldwide. You can use it for receiving money from freelancing website such as Fiverr, Upwork, etc
PayPal Holdings, Inc. is an American company operating a worldwide online payments system that supports online money transfers and serves as an electronic alternative to traditional paper methods like checks and money orders. [Wikipedia]
As you are here it is 99.99% sure your country doesn't support PayPal. So, I'm here to show you how to make a PayPal account in your country. You can make PayPal account without credit card. At my case, as I belong to Pakistan, and PayPal doesn't support Pakistan. So, I will show you how to set up a PayPal account in Pakistan. You can follow this method for your country as well if you belong to any other country.

So here's what are the requirements? 

1: VPN [Optional]. It will also work on your original IP as well.
2: Address of UAE / DUBAI / Emirates. [ Recommendation: LINK 1LINK 2 ]
3: Email address, it must be a temporary email with good domains [Recommendation: ReceiveMail.Org ]. After creating an account you can add your personal email.

How to setup a PayPal account

STEP 1:
Goto: PayPal.com
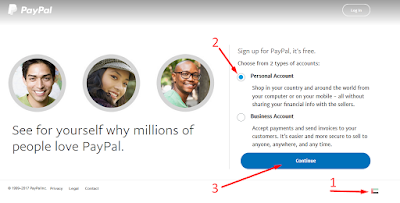
Click on Signup
Click on Signup
Click on Signup
STEP 2:
  • Choose the country: United Arab Emirates
  • Choose Type: Personal
  • Press: Continue
Choose Country - Account Type And Continue
Click on image for zoom
STEP 3:
Get Temporary Email Account visit: ReceiveMail.Org or RecMail.Net.
  • Country: UAE (must be)
  • Email: Temporary Email
  • Password: Your Password
Get Temporary Email Account visit: ReceiveMail.Org or RecMail.Net.
STEP 4:
Enter your real details here, expect Address and Phone number.
  • Real Name
  • Real DOB
  • Real Nationality (It will help you to get rid of Limitation to your PayPal.)
  • Real National ID CARD Number.

Now visit these 2 links, LINK 1 and LINK 2. For Fake Address and Phone.
  • Fake Address
  • Fake Phone
UPDATE 22-July-2019: Address must not P.O BOX or BOX number,  it is blocked by PayPal. It muct be something like "Deira" search for such address that includes "Deira".
Checkmark the agreements and Press Agree and Create Account.
Enter your real details here, expect Address and Phone number
STEP 5:
ByPass Add Card this option.
Just visit your email inbox i.e ReceiveMail.org and check out your email will be there Click on Confirm Email Address.
Click on Confirm Email Address

And Re-Login to Confirm Email.
Re-Login to Confirm Email
STEP 6:
Your PayPal is ready now you can receive and send payment. Before sending or receiving money. Goto setting and do some settings.
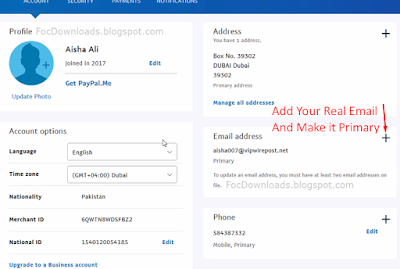
  1. Add your personal email address, verify it and make it primary address. Don't remove the first temp email.
  2. Add security question.
  3. Add customer pin.
Add your personal email address, verify it and make it primary address
Add Your Personal Email
Add security question and customer pin

Your PayPal Account Is Ready!
Click for Zoom

Video Tutorial


Comment below if you have any question or need help.

List Unsupported Countries (You can create PayPal in these country):

Afghanistan, Cocos (Keeling) Islands, Haiti, Monaco, Tromelin Island, Akrotiri, Coral Sea Islands, Heard Island and McDonald Islands, Navassa Island, Uzbekistan, American Samoa, Cote d’Ivoire, Iran, Nigeria, Virgin Islands, Antarctica, Cuba, Isle of Man, Northern Mariana Islands, Wake Island, Ashmore and Cartier Islands, Dhekelia, Jan Mayen, Pakistan, West Bank, Bangladesh, Egypt, Jersey, Paracel Islands, Western Sahara, Bassas da India, Equatorial Guinea, Juan de Nova Island, Paraguay, Zimbabwe, Belarus, Europa Island, Korea North, Puerto Rico, Bouvet Island, French Southern and Antarctic Lands, Lebanon, Serbia and Montenegro, British Indian Ocean Territory, Gaza Strip, Liberia, South Georgia and the South Sandwich Islands, Burma, Georgia, Libya, Spratly Islands, Cameroon, Ghana, Macau, Sudan, Central African Republic, Glorioso Islands, Macedonia, Syria, Christmas Island, Guam, Federated States of Micronesia, Timor-Leste, Clipperton Island, Guernsey, Moldova, Tokelau.

Fastest Emails Receiver - Create Temporary Email With One Click

Fastest Emails Receiver - ReceiveMail.org
Are you tired of receiving fake/spam/junk emails? Sometimes you really need to signup while entering any website, such as a site which demands to complete a survey, and you really don't want to spoil your actual or real email address. Here's is the solution to get rid of this issue and make your actual email clean of spam emails.

About ReceiveMail.Org

So, here I'm introducing the best website to create a disposable email. You can create a temporary email just with one click, there is no limit to create temp email you can create as many emails as much you need. The best thing I found here at this site is its server is very fast, you will be able to get your email within seconds once it sends. Security, of course, it matters when it comes to private emails, this website uses an algorithm which encrypts your emails and which can't be decrypted easily. Be anonymous with an anonymous email.

This site has 8 fresh and private domains and they are claiming they will add more domains in the future. Their domains are clean and not involved in any spam. You can use it these emails for signup to Facebook, Twitter, Reddit, and other social media websites, it will simply bypass the verification if your IP was not blacklisted.

How to use ReceiveMail.org?

Goto:  ReceivEmail.Org
Or
Goto: RecMail.Net

Generate Random Email Address
After clicking on Generate Random you will get a temporary email address, copy that and send your emails to that email address or use that for while signing up on any website.
Copy-Email-Address
I signed up on Walmart for testing, here's you can see I received email click on your email and it will be expended. 
Email Received - Collapsed
Collapsed
Email Received - Expended
Expended
You can create any custom email as well like for example I'm creating an email with a name itxboss, let me show you how you can do it.
Enter your custom id, select domain and Set it.

Now you can receive email on this custom email address
Now you can receive email on this custom email address.
What will happen if you need your old email address how you can access it? For example, if you need your email address for resetting your password or something else. It's simple. Just set as I set the custom email address. Or you can access it anytime by saving/booking its URL/Link.
The email I created was itxboss@vlov.org, and my URL was https://www.receivemail.org/#/itxboss@vlov.org so I saved it and revisit it so I can see my emails there.

Video Tutorial


If you need any help you can simply leave a comment below or contact us.

How to get SSL Certificate for FREE - HTTPS

How to get SSL Certificate for FREE - HTTPS

Hi web developers, websites owners, today I'm here for you with another great tutorial. It's my second tutorial on How to get an SSL certificate for free. But according to my first tutorial, the SSL was provided by Cloudflare.com. My this tutorial will show you how to get the best and free SSL certificate for your site, you can renew it for free as well. I will recommend you this method.

Also see: How To Get SSL Free Forever by CloudFlare

What is SSL?

Define (info.ssl.com): SSL (Secure Sockets Layer) is the standard security technology for establishing an encrypted link between a web server and a browser. This link ensures that all data passed between the web server and browsers remain private and integral.

How the SSL works?

Why SSL is important for a website?

SSL is actually encrypting the data between the user and the server. It is very important if you running a financial or eCommerce website because the users are entering their important data such as credit card or debit card information. Also, you must need SSL if you want to get information from users such as phone number or their login data etc because these are also sensitive data for a user to transfer their data through a secure channel you may need to SSL Encryption. You can improve your search engine ranking with SSL. You can prevent forms of website hacking.

How to get a Free SSL Certificate

STEP 1:
SSLforFree.com
STEP 2:
Enter your website address and press Create Free SSL Certificate

Enter your website address

STEP 3:
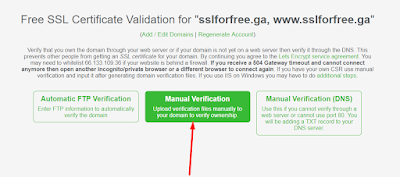
Select the validation method I would like to suggest you Choose Manual Verification.
Choose Manual Verification

Now click Manually Verify Domain
Click Manually Verify Domain

STEP 4:
Now you may need to download 2 verification files and upload it to your file manager. Before uploading you may need to create 2 folders. First folder name .well-known now open this folder and create another folder inside this the next folder name will be acme-challenge now upload that 2 files that you download from the sslforfree.com.

Download 2 verification files

Create .well-known folder.
Create .well-known folder

Now create acme-challenge folder.
Now create acme-challenge folder

Now open acme-challenge and upload the downloaded files from SSLforFree.com.
upload the verification files
STEP 5: 
Click Download SSL Certificate
Download SSL Certificate

Upon clicking on Download SSL Certificate, the Certificate will be generated.

STEP 6:
Certificate Successfully Generated you will get your Certificate, Private Key and CA Bundle.
Certificate, Private Key and CA Bundle

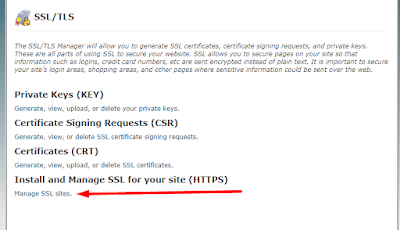
Goto your cPanel > Security > SSL/TLS 
cPanel > Security > SSL/TLS

Click Manage SSL Sites
Manage SSL Sites

Choose your website, and copy the Certificate, Private Key and CA bundle and paste it here in the required box.
Install an SSL Website
Now click Install Certificate. Now clear your cache and cookies

That's all you did it. :) 2-10 minutes required for SSL Certificate to start working perfectly.
SSLforFree.ga
Our domain is working with on FREE SSL :)
https://www.sslforfree.ga

Video Tutorial


Try it and if you faced any problem just comment below I will help you.

How to Make Free Calls Online From Computer To Mobile

Make Free Calls Online From Computer To Mobile

Make Free Calls Online From Computer To Mobile

 I was in search of free calling service, actually i was trying to call over internet to phone free of cost. I tried many searches on keywords "free phones, free phone call, free mobile call, free call pc to mobile, free call, free cell phone, free international calls, free call online, free internet calls, call free, international calling, phone call, ip phone, internet calling, free phone calls, voip, voip calls etc" But i found no success :/.

Then i tried to visit some old websites that i was using about 5years ago, that was EvaPhone which is a free international calling service, but i saw they change their rules etc, and many thing that do not allow me to make free call online. I also tried IP Phone calls, and other such as VOIP calls but no success.

So then i tried something more, and search more about this then i found a great website site for to make free call pc to mobile, i.e GlobFone.
GlobFone is a very useful website to make free call for 1 minute and 30 for free and you can do it unlimited time. I tried no signup required to make free calls, you can call unlimited time.

You make free call to Pakistan, free call to India, free call to Philippine, free call to Saudi Arabia, free call to Afghanistan, free call to Africa, free call to US, free call to Bangladesh, free call to China, free call to Canada and you can make free call to all countries.

How To Make Free Call Online

STEP 1:
Goto GlobFone.com.
You will see a form like this.
Make Free Call Online

STEP 2:
1. Select your country 
2. Type your number
3. Press CALL

Make Free Call Online
STEP 3:
Wait your Call will be in progress.

Make Free Call Online

In case you want to call again, use a plugin Zenmate or Anonymox change your ip and call again.

Video Tutorial


How To Get A Free Credit Card And US Bank Account


Hello friends!! Today am gonna show you how to get own free Credit Card!! You can use it internationally, you can withdraw your money at any ATM, worldwide.
As am from Pakistan!! And there are some banks credit cards which are accepted internationally such as Standard Chartered, MCB (Lite Card). But making an account at such banks needs too much verification's and at the end they decline the application, they mostly needs business persons. An as a result, we can't shopping online from sites like Amazon, eBay etc!!
So, i found a solution for this i.e .. PayOneer! You can do shopping with PayOneer credit card You can receive your income/money/earning with this credit card. This company will also provide you a US bank account you can receive money with that and your credit card will associated to that account, all those sites which are providing your earning/income by BANK WIRE you can use PayOneer company for that. If any site do not accept your country banks such i never saw any site that accept Pakistan banks to buy something or to get your money, so PayOneer is the solution to get your money at your bank.
PayOneer is now accepting Pakistan banks to withdraw your money. You can use Bank Transfer for withdraw your PayOneer money, Credit has transaction charges while the bank transfer fee may vary according to the selected country and currency. PayOneer has the power to accept mostly countries and their banks!!

So lets Start How to create an account for it and get approved quickly

Follow these step

Visit Payoneer.com Click Here

STEP 1 : Click on Signup & Earn $25

Signup & Earn $25

STEP 2: Choose the method for withdraw.
    If you Choose BANK then it is necessary that you have a bank account and you will need to enter your bank detail during sign up.
    If you choose Prepaid MasterCard® Card the PayOneer will ship you their own credit card you can use that credit card any where, and any ATM.
    I will go here for credit card as i have no bank account yet. Select it "Prepaid MasterCard® Card" and click SIGNUP

Choose the method for withdraw

STEP 3: Enter all the details they needed, NOTE: Enter the DOB which is on your GOVERNMENT ISSUE ID CARD. Date of birth as listed on your government-issued ID. You must be over 18 years old to apply. They will request you for your ID card if your application has some problem and they will check your DOB that must needs to be match with your account dob. After entry click NEXT.
Getting Started
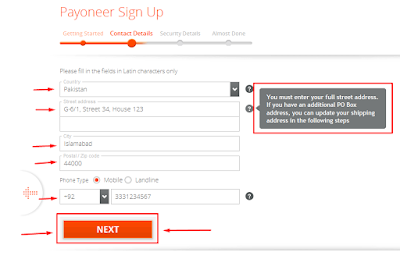
STEP 4: Enter the a proper address, NOTE: PayOneer decline mostly requests because they can not confirm user address. So, if possible try to use any proper address where home can be located. If you are living at a village you can you use your friend address as a alternative shipping address, Alternative Shipping you can find this form at last step. Add your correct phone number if your account has some problem you can easily recover it, by calling PayOneer. After filling click NEXT.
Enter Address
STEP 5: Update you Security Details i.e Password, Security Question. Security question is very important to remember for recovering/resting your password. Now Click NEXT.
Security Details

FINAL STEP: Now its the time to select any Government ID. Driving License, Passport, National ID.  Add your ID number and other details they ask, Now if you want Alternate Shipping then check Enter Alternate Shipping Address. And Agree their all terms and Click on ORDER.
Government ID -Final STEP
You will receive an email having a reference number if you have any problem you can contact them and provide them your reference number. Your application will be pending for sometime, they review your application and will send you a confirmation email, mostly they will review within 10mints, in rare case you they will review within 3-5days.
Email after Submission of request
Application Approved
Check it Approved in 7minutes
And if they needs some additional data, that will be your ID Card scan you can simply take a picture of both sides of your ID CARD and upload to their site.
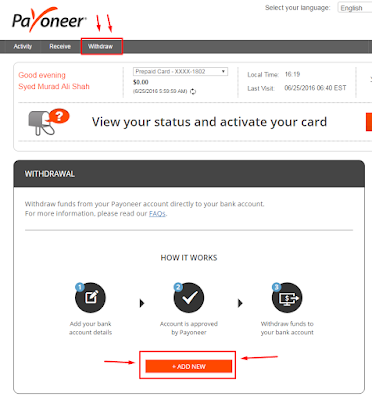
You can add your local bank later too, after they approve your application. Go and login to your PayOneer account then Click Withdraw >To Bank Account > +ADD NEW.

Withdraw >To Bank Account > +ADD NEW
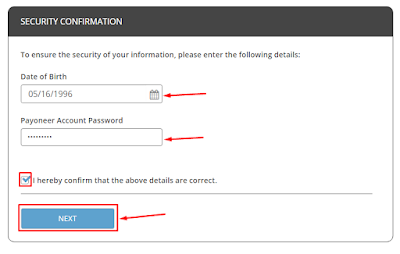
At next page Security Confirmation will be required add your dob + password here check the box and NEXT.

Security Confirmation
You enter you bank details and SUBMIT it and you done this.
Enter you bank details

You can also check your US bank details. Just goto Receive > Global Payment Service And check your US Bank details.
Check your US Bank details

Earn $25 With Your PayOneer

You can earn $25 if you referrer someone, and your referral will also get $25. So, After gets approved goto "Refer a Friend" and copy the link your referral link, and share it.
  

See Video Tutorial


If you have still any question comment below, or contact us