Showing posts with label Tricks & Tips. Show all posts

How to fix Google AdSense error "We apologize for the inconvenience..."

How to fix Google AdSense error "We apologize for the inconvenience..."

Google Adsense Publisher

Google AdSense is an excellent way for bloggers to make money from their blogs. You can sign up as an advertiser and place ads on your site that will generate revenue based on impressions, clicks, or conversions.

While using Google AdSense, you may face a lot of issues and errors. From the beginning to start with a new AdSense account until you get your first payment. Anyway, I will let you know about other issues some other time. Right now, I'm letting you know about the basic problem many AdSense publishers face while using the AdSense dashboard.

When you click on the Policy Center or Payment settings, the below error will propagate. 
We apologize for the inconvenience, but we are unable to process your request at this time. Our engineers have been notified of this problem and will work to resolve it.

It's very frustrating because many others will say to fix the Google AdSense issue, "We apologize for the inconvenience..." then clear cookies, cache even some will say log out and then log in after some days bla bla bla. I will tell you don't listen to them. :P

We apologize for the inconvenience, but we are unable to process your request at this time. Our engineers have been notified of this problem and will work to resolve it.

The only reason for this error is that you are using Ads Blocker, no matter which ads blocker you are using, but the ads blocker is the only reason for this issue.

How to fix Google AdSense error "We apologize for the inconvenience..."

  1. Disable Ads Blocker.
  2. Hit Refresh or F-5.
Disable ad blocker for Google AdSense
Disable Ad Blocker for Google AdSense

After disabling Ad Blocker hit Refresh

I'm sorry for making this tutorial a little bit longer. That's what the Google Search Engine algorithm wants me to do; otherwise, you won't find my tutorial on top of other pages.  

Video Tutorial


How To Get Unlimited Coins in Stronghold Crusader and Extreme

How To Get Unlimited Coins in Stronghold Crusader

Unlimited Coins in Stronghold Crusader

Stronghold is one of the best game, but the difficulty of this game sometime make you cry. When I was in playing Stronghold Crusader, I used to spend days on it to get coins and defeat my opponent. I placed a lot of taxes on my people, I was unable to give them food, and my popularity was 0, for most of the time!
Anyway, I won't recommend you use this cheat because it will literally make you hate this game when you get everything you want you so easily.
But in case you still want to pass any stage you stuck on and spending days on it then must use it lol.
Follow my steps given bellow any get unlimited coins easily.

How to get unlimited coins?

Step 1: Download and Install Cheat Engine

Step 2: Open Cheat Engine and Open Stronghold Crusader or Extreme.
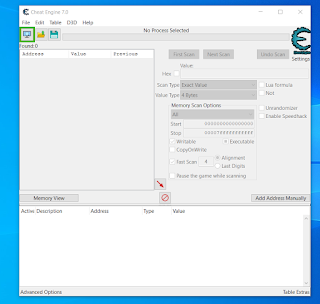
Cheat Engine 7.0

Step 3: Wait while the coins fully loaded, note the coins and press Windows Key to minimize the game.
Check Stronghold Crusader is loaded

Step 4: Click on  "Select a process" (Monitor) and select the Stronghold from the process list.
"Select a process" (Monitor) and select the Stronghold from the process list

Step 5: Enter the value and press "First Scan", Select all addresses and copy the selected addresses.
Enter the value and press "First Scan", Select all addresses and copy the selected addresses

Step 6: Select all the copied addresses and right to "change record > value" and give it any value you want i.e 999999 or whatever you like.
Select all the copied addresses and right to "change record > value"

And that's all open your game from the taskbar and you did it.
Got Unlimited Coins in Stronghold Crusader and Extreme

Download

Download: Cheat Engine
Password: focdownloads.blogspot.com (One-Click Copy Password)
For extracting you may need WinRAR. Download WinRAR Latest Version

Video Tutorial


BTW this post will cover these topics:
How to hack stronghold crusader
How to cheat stronghold crusader
Cheat for Stronghold Crusader
Stronghold Crusader And Extreme Cheat

How To Get Ufone Unlimited Internet For FREE

How To Get Ufone Unlimited Free Internet

Ufone 4G

You will get Ufone 4G Internet for free, with this method. You have to follow all these few steps to get FREE internet, you have to try this for with balance less than Rs.175 because with this method if you have more than Rs.175 it will deduct your balance.
Any way stop intro here and let's move on. 
NOTE: Unfortunately this offer has been ended now!

How to get free Ufone 4G Internet?

My Balance Before Getting Internet
My Balance Before Getting Internet 
All you have to do is just open Facebook Android Application, on the top click Go to Free Mode.
Facebook to free mode
After you entered into Free Mode click See Photos.
Click See Photos
Now you have to click any Data Pack to buy, But here we will buy the best package which 6 GB Internet in Rs. 175, just click BUY
Now click CONFIRM
Now click CONFIRM
And that's all boom you will receive a message that you got your internet package.
You got the internet package
Now just check your remaining Data MB's dial *706#.
Check Ufone remaining Data MB's dial *706#
And that's you can get as much internet as you want.

Video Tutorial


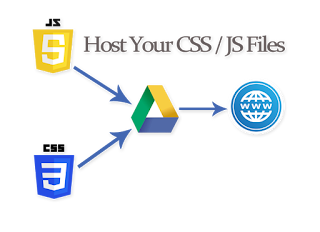
How To Host Your CSS/JS On Google Drive For Your Website or Blogger

How to Host your CSS/JS on Google Drive for your website
Do you want to save bandwidth? or want to save stylesheets or javascript files for your blogger? For blogger you must need to have a files hoster or CDN, I will recommend you google drive, to host your file. It is FREE, and working as CDN too. So don't worry about this problem, I have the solution here for you. All you need to have a Gmail account. And then upload your files to google drive and make it accessible for anyone, and just place its URL inside your website HTML file.

How to Host Stylesheet and Javascript files on Google Drive

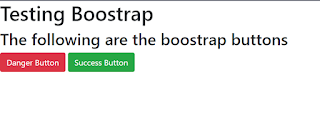
Before the Bootstrap CSS
How To Host Your CSS/JS On Google Drive For Your website
HTML Code without Bootstrap

How To Host Your CSS/JS On Google Drive For Your website
Output
Step 1:
Login to your google drive, and upload your CSS and JS files.
Step 2:
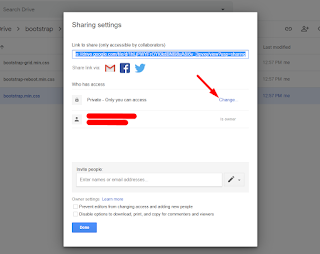
Once your files uploaded, you have to share it with anyone, change its sharing property.
How To Host Your CSS/JS On Google Drive For Your website
Right click on the file you uploaded, then click Share.

How To Host Your CSS/JS On Google Drive For Your website
Now choose advanced.

How To Host Your CSS/JS On Google Drive For Your website
Now change "Who has access" from private to public

How To Host Your CSS/JS On Google Drive For Your website
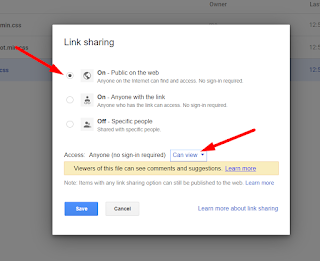
First, choose Public on the web, and choose anyone Can View.

How To Host Your CSS/JS On Google Drive For Your website
Now Copy the Link and click Done
Step 3:
Now its time to make direct download link for your google drive file.
How to generate Google Drive Direct link
Just visit https://drive.recmail.net/ and generate direct link by pasting the copied link and once the link generated to copy the output direct link.

How To Host Your CSS/JS On Google Drive For Your website

How To Host Your CSS/JS On Google Drive For Your website
Step 4:
Now add the copied URL to your HTML file and check its output. You will find that bootstrap stylesheets start working.
<link rel="stylesheet" href="Google-Drive-Direct-Link">
How To Host Your CSS/JS On Google Drive For Your website

How To Host Your CSS/JS On Google Drive For Your website

Video Tutorial

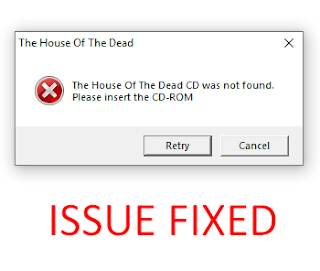
Please Insert the CD-ROM [SOLVED]

Are you getting the error "Please insert the CD-ROM"? It's OK you can fix it, some people will share cracks and a lot of stuff to bypass this error, I will never recommend using EXE crack, such files have a virus, malware, rats and more harmful stuff.
So, what is the legit way to fix this issue? First please don't relate it to The House Of The Dead only,  It can occur on many other games as well such as Need For Speed II, Contra 1987, Aladdin 1993, Hercules 1997, Zuma Deluxe. I'm just using the THOTD game as an example.

How to fix "Please insert the CD-ROM"

This is very simple, all games that are developed in the 90's era or must require Direct X. In this modern era still, some games are using the old version of Direct X.
Download DirectX R and install DirectX (R) Once you did you will no longer receive this error.

Video Tutorial


How You Can Open Port / Forward Port On Any Modem - PTCL

How You Can Open Port / Forward Port On Any Modem - PTCL

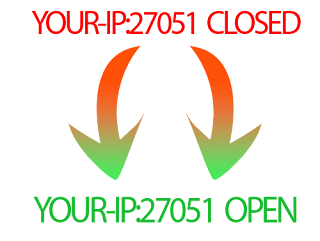
An opening port is quite easy if you did everything perfectly. When I was trying to open port or forwarding a port I faced a lot of issues, First finding a good and accurate method on the internet in some cases is not easy, I tried on USB Dongle, I tried on DSL but unfortunately no success.
Sometimes windows firewall don't allow to Open a port, anyway, we will bypass that in this tutorial you have to follow me step by step to get rid of everything and open your port and enjoy.
How You Can Open Port / Forward Port On Any Modem - PTCL
Image source: openport.io

How to Forward/Open a Port

Step: 1
You need to have a software called Port Forward, click here to download it. Port Forward is trial software which will help us to bypass Windows firewall.
Step: 2
Login to your modem setting area, or modem panel. At my case my modem is PTCL, and panel URI is 192.168.10.1
After login, check your WAN Info and confirm it, which WAN Interface is connected, that assigned an IP to your computer.
In Device Info Click on WAN

WAN Info will show you which interface is connected

Step: 3
Now go to Advanced Setup > NAT > Virtual Servers. Now you have to ADD a Virtual Server, Click on ADD
How You Can Open Port / Forward Port On Any Modem
Step: 4
Now choose the WAN Use Interface which was connected in Step 2. 

How You Can Open Port / Forward Port On Any Modem
You can Select a Service or you can put a Custom Service name. Keep the following setting.
  • Custom Service = TestingPort
  • Status = Enable
  • External Port Start = 27051
  • External Port End = 27051
  • Protocol = TCP/UDP
  • Internal Port Start = 27051
  • Internal Port End = 27051
How You Can Open Port / Forward Port On Any Modem
But, wait what about the Server IP Address: ?, We have to find it manually there are 2 ways to find it.
First: Open CMD and type ipconfig and hit ENTER
Under your network connection, IPV4 is your local machine IP address.
ipconfig, Finding IPV4 address
Second: Open your Network Properties. And you will find your IPV4 address there as well. I think the second one is more easy and accurate.
How You Can Open Port / Forward Port On Any Modem

How You Can Open Port / Forward Port On Any Modem
Now enter this IP Address into the Server IP Address, and click Apply/Save.
How You Can Open Port / Forward Port On Any Modem
And that's all you did it.
Step: 5
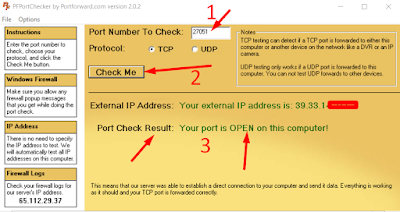
Let's go and verify it. First, you have to verify it using PortForward Software that you download in Step 1.

How You Can Open Port / Forward Port On Any Modem

How You Can Open Port / Forward Port On Any Modem

How You Can Open Port / Forward Port On Any Modem

Once you have checked your port using PortForward and you got the result OPEN, its mean your Port is available to the public on the internet, so they can access your port using the public IP address and Port. You can check your port on various sites here I'm checking it with https://portchecker.co
PortChecker.co - How You Can Open Port / Forward Port On Any Modem

Video Tutorial

If you have any question or facing problem you can simply comment below I try my best to help you out and fix the issue you are facing.

How to Install Windows 10 without USB or DVD

How to Install Windows 10 without USB or DVD
Are you facing trouble with your Windows 10? Want to install renew your Windows 10 but didn't have a USB or CD  or DVD? Don't worry you can install your Windows 10, without having a Windows 10 image CD / DVD or USB. You have to follow few simple steps and you did it.
Also read: How to make your USB Bootable

How to install Windows 10 without CD or USB

Step: 1
Click START and click Settings.
Click START and click Settings

Step: 2
Now click Update & security
Also read: How to Register Windows for FREE 10/8/8.1/7
Step: 3
Click Recovery
Click Recovery
Step: 4
Click Get Started
Click Get Started

Step: 5
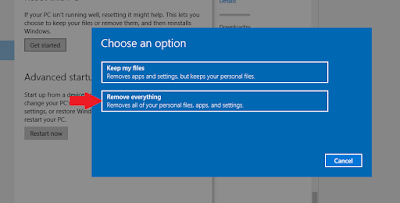
A popup Window will appear select Remove Everything. (I recommend to select Remove Everything)
A popup Window will appear select Remove Everything
Step: 6
Everything is perfect, you may need to wait for some time. Removing everything will take time a little bit longer, but trust me that is the best option, If your PC hit by some viruses like trojan, rat, horse or some malware, It will completely clean your PC from that. 
Once this is done, you will get to the Windows 10 installation setup after Restart, I hope you will pass the other simple steps of the Windows installation.
And that's all you will get to the Windows Installation. I don't have the other screenshots because of the PC restart after the step-6 and then enter to the boot Windows installation.

Video Tutorial

Updating...

How to Extend Adobe Trial Period of Any Adobe Product

How to Extend Adobe Trial Period

Explanation

 Adobe is has a lot of products but many of them are paid, but you can use them free for some time. Once the trial expired, you will need to pay for the product and then you can use that product, otherwise, you will get the error 00 Days Remaining.
 Adobe Illustrator has 7 days trial period, Adobe Photoshop has 30 days trial period, Adobe After Effects has a 7days trial period, Adobe Premiere Pro has a 7days trial period, etc. Once it is expired you can use the software again.
 So, I will show you how to get rid of it, you can extend it for free. Please keep in mind this is not a crack or something. It is just a trick with which you can extend the Trial Period of the products.

How to Restart the Trial Period of Adobe

Step 1:
You have to find the AMT folder in the folder of your Adobe Product. To make it concise I will use Adobe Illustrator CC 2018 in my example.

Goto Program Files > AdobeAdobe Illustrator CC 2018 > Support Files > Contents > Windows > AMT
Path :
C:\Program Files\Adobe\Adobe Illustrator CC 2018\Support Files\Contents\Windows\AMT

Here you will find a file name application.xml, Right click on it Cut and Paste it in any other drive.

application.xml, Right click on it Cut

application.xml, Paste it in any other drive
Step 2:
 Right-click on application.xml and open it with Notepad
Now find <Data key="TrialSerialNumber">
You will see a number there for example:
<Data key="TrialSerialNumber">926287011921234454671866</Data>
Change it to
<Data key="TrialSerialNumber">926287011921234454671867</Data>
I mean just +1 to the last number, and save the notepad.

application.xml and open it with Notepad

Now find <Data key="TrialSerialNumber">

Just +1 to last number

Step 3:
 Now Cut the application.xml and Paste it back into the AMT folder.
Now Cut application.xml

Paste application.xml in the AMT folder
Step 4:
(If you're logged in, then no need of this step)
Disconnect the internet to bypass the login.
Disconnect the internet to bypass the login
Step 5:
Sign In Later

Sign In Later

 Start Trial :) I mean again ;)

Start Trial - again

Running Illustrator with Start Trial Again

Video Tutorial

If you have any question or facing problem or have some suggestion comment below.